Wednesday, July 29, 2015

G'Day Love With Cheery Lynn Designs


G'Day Love! 
It's Lisa back this week with another New Release Diecut from Cheery Lynn Designs!
 It's Kaptain Kangaroo! 
The name of the diecut takes me back to my child time. I remember watching Captain Kangaroo on Saturday mornings. Such a great memory and blast from the past. When I was thinking about what I wanted to make with him, I thought about so many different backgrounds. Suddenly, I thought of one of my favorite movies from years ago, Crocodile Dundee and his love for his country. It then became about love and hearts. I used two of the smaller and one of the largest heart from Two of Hearts. I diecut it in red and Kraft paper and cut the inside of the red out and placed it on top of the Kraft paper. I stamped Love on the bottom corner heart and added little white dots on the edges. 


There are two Ivy Corner Flourishes in opposite corners and in the center behind the Kangaroo is a Priscilla Doily. Love it! Last but not least I added little flowers from Miniature Rose with little pearls in the centers. 


I cut the Kaptain Kangaroo out once in Kraft and one in red cardstock. I used the G'day for the inside and I used white cardstock for his ears and black cardsock for his eyes and colored his nose with a black copic. 

Cheery Lynn Diecuts Used:


Thanks for stopping by today and be sure to check out this week's challenge " anything goes" for a chance to win $20 at the Cheery Lynn Designs store! 
Hugs Lisa

Friday, July 24, 2015

Kindness

Hello everyone! TGIF
I have had a roller coaster of drama this week at work! Crazy and Stressful! Thank goodness I'm off this weekend and all next week! Off to Vegas Baby tomorrow! Excited! 
So today I'm sharing a new card that I made a few days ago, but I haven't had the chance to upload it until today. It is inspired by this week's cardabilities #127


Lots of mixed media here. No patterned paper, but lots of inking, flowers and bling.


Im so glad I was able to use some of my old stamps and old flowers from my stash. 


Here is the sketch # 127  Thanks 


Have a wonderful day! 
Hugs
Lisa 

Wednesday, July 22, 2015

Thankful For You With Cheery Lynn Designs


Hi, Its Lisa back again sharing more of the New Release by Cheery Lynn Designs
Today, I'm sharing Tom the Turkey! It truly is a beautiful diecut with amazing details. So originally, I colored the turkey with copic markers and well since I'm not a great at coloring it was a disaster! So THANKFULLY (pun intended LOL) you can be like me and still get a fantastic looking turkey! 

I diecut the turkey once in Kraft cardstock and once in brown cardstock. I fussy cut out the brown pieces that I wanted to highlight and glued them to the top of the Kraft. I then diecut just a piece of red and yellow for the feet and beak then layered them on top. Easy and pretty fast! I chalked the edges of the Kraft and Tom is ready to go! 


The base of the Kraft card is 5 x6 and I cut, chalked and then embossed another piece of Kraft 4.5 x 5.5 in the background. For the Birch tree with Cute Critters, I used the same brown cardstock as Tom the Turkey. I diecut 3 different color strips, red, orange, and yellow of Flourish Leaf Set. I then cut the leaves off and placed throughout the tree. You will have leftovers but you can always save them for another autumn card. :) The New Grass Border 2 was cut twice in yellow and placed on the bottom. I stamped my sentiment and diecut it out with Pierced Stacker #4 with chalking on the edges. I used the little owl and the squirrel to finish this Thankful Card to a friend or loved one! 


A few pop dots underneath, but ready to mailed in a regular envelope...

Cheery Lynn Diecuts Used:


Thanks or stopping by today and be sure to check out more inspiration and New Release diecuts from our fabulous DT at Cheery Lynn Designs Blog. While your visiting, be sure to join our challenge this week "silver and/or gold" for a chance to win $20 dollars at the Cheery Lynn Designs store
Hugs Lisa 

Monday, July 20, 2015

Kindness With The Shabby Tea Room Summer Picnic #256!

Hello Shabby Girls! 
Today, I'm sharing with you a new card for The Shabby Tea Room inspired by this week's photo. Lots to choose from in this photo and I was planning to add some tea items but I also really wanted to make a vase and show the basket and towel. I ended up having to cut it back because it started to look almost like too much....you know what I mean? lol


I used two French Pastry doily and French Pastry Tiny Doily and an Ivy Flourish Corner that is made from Cheery Lynn Designs and can be bought from DiesRUs.com or from the Cheery Lynn Designs Store. The vase was made with my cricut and I embossed it with tiny white stamps and added a resin butterfly in the center. I stamped the basket in brown ink and the fussy cut out the edges. The stamp is from Heartfelt Creations called Basketweave Background. I added pink flowers from Recollections. 


To represent the towel that reminds me of my mother and my husband's mother, I cut white cardstock and added some pink lines to the edge with my copic marker. 


Here is the beautiful photo inspiration!

Summer Picnic #256 


Be sure to stop by The Shabby Tea Room for my Shabby Inpsiraiton and to 
enter our challenge to win form DiesRUs.com
Hugs Lisa 

Sunday, July 19, 2015

Thinking Of You

Happy Sunday! 
Well, today I wanted to make a card based off the sketch from Viva La Verve July #3.
I bought these Prima papers recently from scrapbook.com  They are gorgeous! So soft and vintage.  It tried to find some matching flowers but I only had some pink flowers in this color....close enough...I wasn't in the mood to make them today...lol


The leaves are from Cheery Lynn Designs and I added some pearls in a few places. I distressed all the edges with my Distrezz It All. The stamp is super old...so sorry I don't remember who made it? 


A closer view...so shabby chic....


Here is the sketch this week! Thank you! 


Have a great day! 
Hugs Lisa 

Saturday, July 18, 2015

Hello Foxy!

Hello! 
Today, I'm sharing a new card that I made yesterday for my youngest daughter. She loves Foxes and I have a stamp that I bought at Michael's in the dollar section but then I also bought these cute little stickers from Recollections. They were perfect and I was lucky to have matching rust color paper too. 


The birch tree, bunny and leaves are from Cheery Lynn Designs. I love the stitched hillside diecut from Lawn Fawn. I stamped Hello and fussy cut it out and chalked some of the edges.  


The Kraft background I ran through my bark embossed folder. This card took a half hour to make... 
Gotta Love that! 


Thanks for stopping by today! 
Have a great day! 
Hugs Lisa 

Wednesday, July 15, 2015

New Release Trick Or Treat With Cheery Lynn Designs


Hi everyone! 
Yes I know it is July...however, it is time to share the New Release with Cheery Lynn Designs
Lots of wonderful diecuts! Here are just a few of them for your Halloween projects. 


I knew I had to use these fabulous pumpkins for my first card. I also love the trick or treat title. I used diamond glaze on both the pumpkins faces and the title to give it an extra shine.  The bats are part of the new collection and there are 6 of them! The spiderweb is an older diecut but is great to use with the new collection. 


A closer view...

Cheery Lynn Diecuts Used:


Thanks for stopping by today! 
Be sure to check out this week's New Release and more inspiration at the Cheery Lynn Blog and also enter this week's challenge "white on white" for a chance to win $20 at the Cheery Lynn Store! 
Hugs Lisa


Tuesday, July 14, 2015

Thinking Of You

Hi! 
Well, Its Tuesday morning and I have been busy getting several posts ready till the end of the month. I'm trying to keep ahead before a head out for vacation again. Today I'm sharing a new card I made last night for Mojo Monday #406. I wanted to use some vintage papers and some of my older diecuts from Spellbinders that have a nice vintage touch to them. I also used one of my Verve stamps and love the font on these Treasured Words. 


The papers are from Graphic 45 Vintage Romantique. I fussy cut 3 layers of the paper flowers and pop dot and glued together. It reminds me of a card that my grandmother used to send me when I was a child. Wonderful memories. 


It took about half hour to make and it is really great for a love relative who remembers having these kind of vintage cards sent to them. 


Here is the great sketch! Thanks! 


Have a wonderful day! 
Hugs Lisa 

Sunday, July 12, 2015

Relax and Count the Waves...

Hello everyone! 
So it's Sunday and my last day of vacation...sigh...back to work tomorrow! 
I'm not sure if anyone has noticed? but this summer I'm all about nautical and beach cards. I just can't stop thinking about the ocean and the peacefulness it brings to my soul. So what a wonderful inspirational photo by Verve has given to me to play with and so many others on my favorite month of the year! It is called "Sensational Stripes" and that is exactly what it is all about! 
Here is my interpretation of this month's photo. 

I have two sets of striped papers, one in baby blue and one in grey. I couldn't decide if I wanted waves and beach sand, wood or fences, nautical banners or shabby chic, nautical pieces or ocean animals/seashells? So guess what? As you can see I placed them all on one card! lol 


The paper wood is a stamp from Heartfelt Creations and I embossed it in white, then added little silver stickers on the ends. I diecut the fence, stamped and embossed Verve nautical wheel & anchor. I diecut the waves in blue and Kraft paper from Reverse Confetti. Stamped some seagulls from Heartfelt Creations. I printed the sentiment up on my computer and placed it in the shabby resin window. A little burlap in the center. So finally, I thought I was ready to take some pictures....then I last minute I changed my mind and had to add a seahorse and some shells from the Internet....whew...don't think I can much more on here? lol 


Here you can see more details...it may be a bit busy for some of you scrappers/ cardmakers out there...However I had a blast making it and it feels complete to me...now I can Relax....lol


My inspirational photo by Verve....thank you so much! It is so me....


Thanks for stopping by today! 
Have a wonderful relaxing day!
Hugs Lisa

Saturday, July 11, 2015

Awesome!

Hi! 
It's Saturday afternoon, and I wasn't planning on getting any cardmaking done today...However, I printed up this week's Viva La Verve July #2 and I thought if I could get some colors in my mind then I could make it quick enough! Ta Da! 


I recently bought this stamp from Verve and I totally love it! It is a great sentiment for any occasion. I wasn't planning to use any flowers HONEST! When I placed the orange bow down... then and only then I went from trying to make a manly card with navy, white and orange to adding some orange flowers and leaves....lol


I free handed all the little dots around the circles, rectangle and banners. No diecut for the banners just guessed what size I wanted and then cut them out.


here is the great sketch! Thanks againVLV! 


Have a great day! 
Hugs, Lisa

Thursday, July 9, 2015

Beautiful Day!

Hi, 
Today, I'm sharing a new shaker card using several diecuts. I loved how my other recent shaker card came out so, I thought I would go ahead and make another for my own personal stash. 
This time I added some water waves and boats. The diecuts with the stitching are from Lawn Fawn.  The cute little boats are from Impression Obsession. I just cut them out twice and glue the bottom piece to the boat base. The seagulls are from Heartfelt Creations stamps and I fussy cut them out. 


I punched out two circles, one in white and one in red, then and fussy cut the red pieces and glued them on top to make my beach ball to offset the red lighthouses from Cheery Lynn Designs. The stamp on the acetate is from Heartfelt Creations too. I added two wheel's in the corner from Verve stamps and added red, white and teal beads in the center of my shaker. 


Its such a cheerful card...


Thanks for stopping by! 
Have a wonderful day! 
Hugs, Lisa

Wednesday, July 8, 2015

Strong Anchor With Cheery Lynn Designs


Hello everyone! 
It's Lisa here today sharing another shaker card for Cheery Lynn Designs
I really Love shaker cards and even though it takes a few extra steps...I find they are fun to make and recipients love them too! 

I have been in a nautical mode for most of the summer...still thinking about the beach! This week's challenge is "In Stitches". I don't know how to sew with a sewing machine but I can make faux stitches. I used a black archival marker and with a template made black stitches all the way around the edges, on the shaker piece and on the waves of sand . For the shaker card I used the two largest A2 Frames Rectangle. Then cut it again with white foam. I used the largest rectangle in light blue and again with acetate to create the window for the beads. 


I cut out the two Lighthouses in medium blue, one set of the Clouds and one set of the Birds from Bird Bath. I added a little light blue distressing ink to the birds. I diecut Ships Anchor in light blue and colored the chain with a black copic. I placed light blue and clear beads in the center of the shaker and placed the anchor on the top bottom corner. The stamp is on the outside acetate using staz-on black ink. 


Here you can see all the little beads throughout! 

Cheery Lynn Diecuts Used:


Thanks for stopping by today! 
Be sure to stop by the Cheery Lynn Designs and join this week's challenge "In Stitches" for your chance to win $20 at the Cheery Lynn Store!
Hugs, Lisa

Tuesday, July 7, 2015

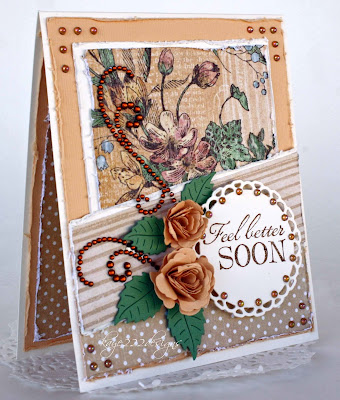
Feel Better Soon

Hi everyone! 
Sharing a new card inspired by this week's Mojo Monday #405
I bought this stamp from Verve a while ago and totally forgot I had it in my stash? In fact, I believe I bought another one just recently? lol Well, I guess it is getting time to start going through my scrapping supplies and clean out some of the old items....
These papers are from Graphic 45 and I bought them out be used again...I believe the last time I had them out was on a scrapbook LO. Now that has been a while!


As I was looking for the right peach/orange flower I couldn't find any so back to making them myself...You can never go wrong with the color! I used Bitty Blossoms for the flowers and Rose Leaves by Cheery Lynn Designs. The circle is from Spellbinders, Splendid Circles. I found some pieces of brown bling that have been sitting around for a while now. I was thinking it needed something else too? The tiny beads are brown and are what I have been using for shaker cards. So I placed them in the corners and around the sentiment. 


You can never have enough Get Well Cards. Hopefully you don't have to use them to often! 


Here is the sketch! 
Its is part of the big contest for the month!  


Thanks for stopping by and have a great day!
Hugs Lisa 

Monday, July 6, 2015

Hi Cupcake! With The Shabby Tea Room!

Hi everyone! 
Exciting news to share today! I submitted a card to The Shabby Tea Room and I was chosen to be part of their DT! It's so exciting because not only do I love their shabby photos every two weeks but now I get to be part of the team too! Many of the photos I have saved and they are on my iPhone face page. :) 
Today I'm sharing my first card with the DT, Inspired by the yellow cupcake photo "Sweet as Sunshine" and the wonderful sponsor Bugaboo Stamps "Yummy Cupcake"


I printed the cupcake image, diecut it with Timeless Rectangles from Spellbinders. The I colored it with copic markers, and I added little white dots with my signo white pen. There are tiny pearls on the white pats of the cupcake and on the top is liquid applique. Instead of the cherry on top I added a yellow flower. 


I added more pearls and some swirls from Zva. I made a bow with my bow maker and the tiny tag is a diecut from Heartfelt Creations, I have a stamp that reads "Hi Cupcake" but it was a bit to big for the tag so I just printed "Hi Cupcake" on the computer. The doily under the image is from Cheery Lynn Designs and the two larger flowers are from the dollar bin at Michael's and the small flowers are from K & Company. 


Here is this week The Shabby Tea Room #255 image. Yum! 


Be sure to see more inspiration at The Shabby Tea Room and play along with our challenge 
Have a wonderful day! 
Hugs, Lisa